Connecting to Italian Servizio Alloggiati
Connecting Your.Rentals to Italian Servizio Alloggiati
This guide presents a step-by-step process to connect Your.Rentals account with the Servizio Alloggiati in order to automate the transmission of guest data, in compliance with Decree 16 September 2021:Servizio Alloggiati - Polizia di Stato
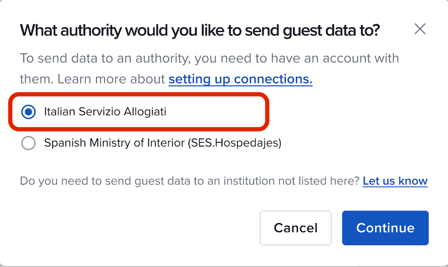
To automate your Guest Check-in processes you will have to connect the account that you have with Your.Rentals with your account at the Italian Servizio Alloggiati.
If you already have a Servizio Alloggiati account, skip to step 2.
If you don’t have a Servizio Alloggiati account, continue with step 1.
Step 1: Creating Servizio Alloggiati account
To request access credentials to the service, managers of accommodation facilities
must refer to the territorially competent Police Headquarters. The contact can be found here: Servizio Alloggiati - Polizia di Stato
Step 2: Access your Servizio Alloggiatti account and have your credentials ready
For the guest data to be electronically sent from Your.Rentals to Servizio Alloggiati, two accounts have to be connected. You make this connection from Your.Rentals system towards Servizio Alloggiati system. In other words, you need to access your Servizio Alloggiati account from your Your.Rentals account.
At this step, you should prepare:
-
The username you use to log in to the Servizio Alloggiati
-
The password you use to log in to the Servizio Alloggiati
-
The Web Service key that you find in the top right corner of your Servizio Alloggiati account

Step 3: Navigate to Guest Check-in page in Your.Rentals.
First go to the Guest menu, and within this menu chose “Check-ins”


Step 6: Create the connection.
To do this:
-
Give your connection a name. This can be anything. If you plan to have multiple connections, this name will help you distinguish among them.
-
Specify the username. Use the same username as when logging in to Servizio Alloggiati portal that you prepared in step 2. Don’t use your Your.Rentals username.
-
Specify the password. Use the same passoword as when logging in to Servizio Alloggiati portal hat you prepared in step 2. Don’t use your Your.rentals password.
-
Specify the Web Service Key. Use the Web service key you prepared in step 2.

Step 7. Choose the listings that should be assigned to the newly created Authority connection
In this step you can select all or some of your listings. You can also choose to do this later.
The guest data will be automatically collected and submitted to the ministry only after the listing is associated to the authority connection.
Option A: If you have only one property registered with Servizio Alloggiati, you will be able to select one or multiple Your.Rentals listings that correspond to that property registered in Servizio Alloggiati


If you choose to skip this step, you will always be able to come to it later.
Step 8: See the newly created connection to Servizio Alloggiati in the list of your Authority connections.
On this tab, you can also add new connections or delete existing ones.

You can find this overview in the “Assigned listings” tab. If you are missing some setup, you will see it in the “Set-up status” column.

Navigate to the “Check-ins” tab to monitor your guest check-ins. As you receive new bookings, the Check-in records will automatically be created, and your guests will be informed about the need to check-in 14 and 2 days before the check-in date.
At first, each Check-in record has a status “Open”. Once the guest starts the check-in the status changes to “Ongoing”. Once all the guests provide their data, the status becomes “Ready” (ready to be sent to Servizio Alloggiati). Once the data is sent to Servizio Alloggiati, the status changes to “Done”. If the guest didn’t provide their data in time, the status is “Overdue”, and if, for any reason, the submission to Servizio Alloggiati failed, the status is “Failed”.

