Multi-account Management
What is Multi-account Management and how do I use it?
What is Multi-account Management?
Multi-account management allows you to create multiple groups of Property Listings. By grouping Listings into multiple Accounts you can easily access them all with your login credentials and configure multiple Payout methods per Owner. For Property Managers working with multiple Listings for different Owners, Multi-account Management will greatly simplify the daily operations and save you time.
We offer you unlimited Accounts without charging extra.
The Multi-account management is for
- property management companies or agencies or individuals who need to manage multiple properties with different configurations.
The Multi-account management allows you to:
- Add and maintain multiple Accounts in one place (Invite existing account or Create new account) so you can manage multiple Listings at ease.
- Easily switch between Accounts (The Account Switcher) to have a clear overview.
- Group Listings by location, type, owner etc. according to your business needs.
- Add different Payment methods to different Accounts to reduce hassle in your accounting
How can I access the Multi-account management?
What can I do on the Management page?
How to navigate between multiple Accounts?
Group Listings according to your business needs under different Accounts
Setting different Payment methods per Account
How can I access the Multi-account management?
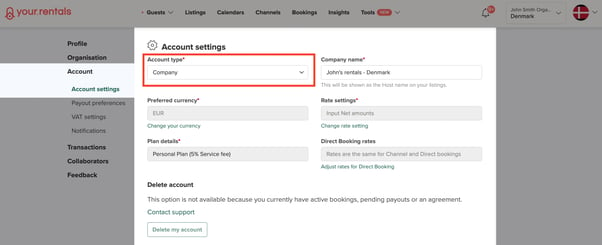
Before we go into more detail, make sure your Account is set as Company, otherwise, the Multi-account management will not be available for you.
- Go to “Settings”.
- Under the “Account” tab, click “Account Settings”.
- On “Account Settings” page, select “Company” for “Account type”.
You will then have access to the Multi-account management.
If you just signed up to Your.rentals, keep in mind that your first Account needs to be verified in order for the Management page to be visible for you.
Once you are set, you can discover the Management page.
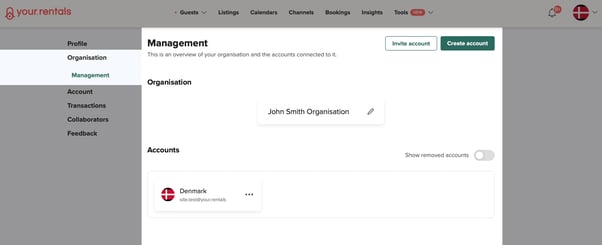
Multi-account management provides you a new tab in “Settings”, the Organisation. This new addition will allow you to Create or Invite multiple Accounts and manage all Accounts from the same place.
- Go to “Settings”, click “Organisation”.
- A new page called “Management” will open.
The Organisation is named by default after your user name (First and Last name).
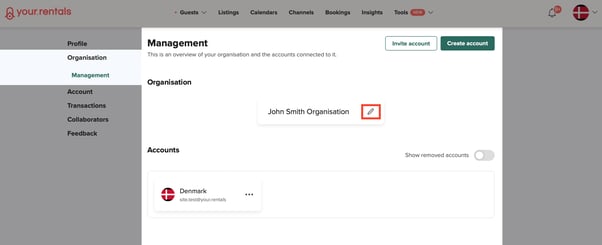
If you like, you can change the name of the Organisation, for instance, change it to the name of your company. If you would like to do that, please follow the steps below:
- Select “Edit”.
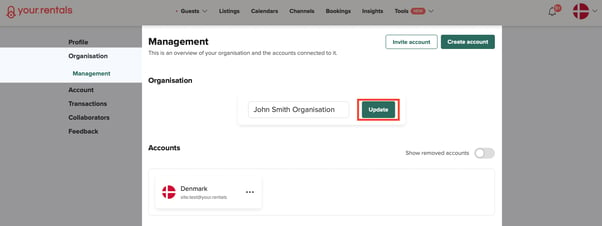
- Change the name.
- Select “Update”.
What can I do on the Management page?
Under the “Organisation” tab on the Management page, you can:
- Add a new Account (Create account and/or Invite account)
- Remove an Account
- Update Account email
- Update Account avatar
How to add a new Account?
You have two possibilities if you want to add new Accounts to your Organisation: you can create a new Account or you can Invite an already existing Account to join your Organisation.
Create a new Account
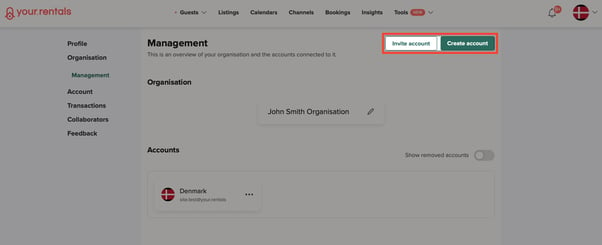
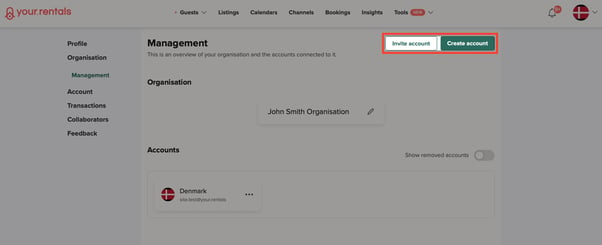
If you want to create a new Account select “Create account” in the top right corner of the Management page.
- When you select “Create account”, the following window will appear:
- Fill in the form.
- Once you have finished, select “Create account” in the bottom right corner.
- The newly created Account will be added to your Organisation.
Invite an already existing Account
If you want to add another Account to your organisation you can invite an already existing Account by clicking on “Invite Account” in the top right corner of the page.
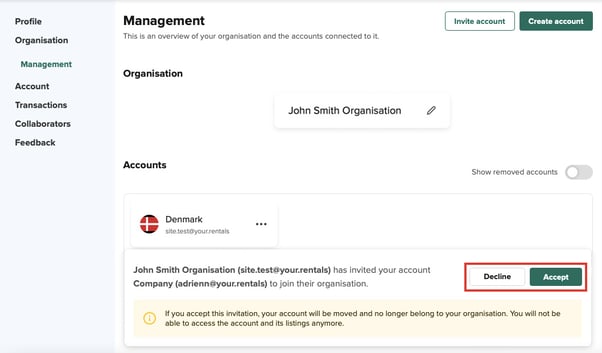
In order to move the Account to your Organisation, the invite needs to be accepted.
If you get any invitation, you will see that at the bottom of the page with the two possible options: Decline and Accept.
Once it is accepted, the newly added Accounts will be visible under Accounts on the Management page.
It is important to keep in mind when the Account is moved to your Organisation, it will no longer be visible and accessible by the old Organisation.
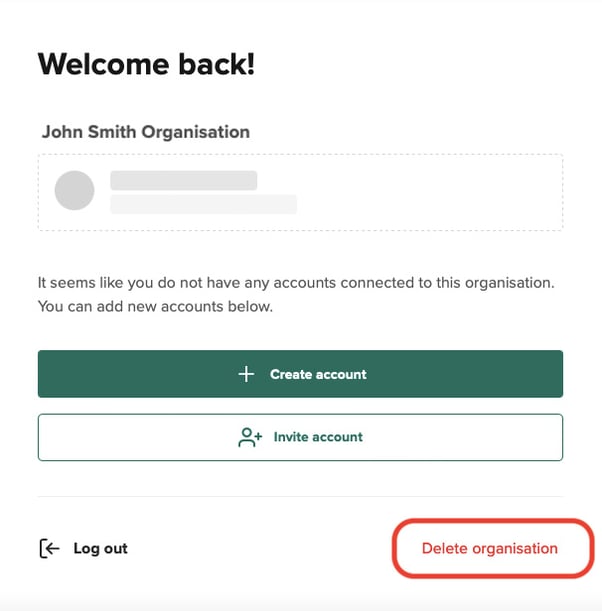
When you move all Accounts from your Organisation to another Organisation, you end up with an empty Organisation. The app will notify you that you do not have any Accounts in your Organisation when you log in and offers you the possibility to delete your empty Organisation.
How to remove an Account?
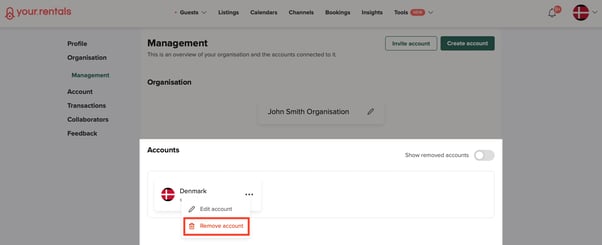
If you want to remove an Account from your Organisation, you can do that on the Management page:
- Under Accounts, you can find your Accounts listed.
- Select the “...” on the top right corner of the Account you wish to remove.
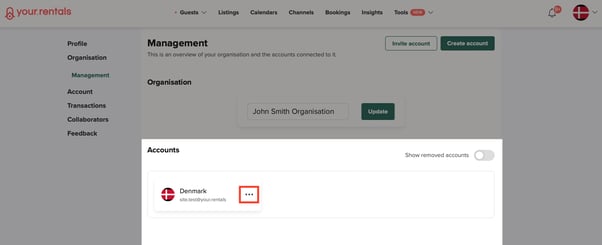
- See the choices “Edit” or “Remove account”.
- Select “Remove account”.
When you remove an Account it means that it will no longer be visible to you under Accounts. Removing an account will, however, only hide it from the Accounts listed in your Organisation, it will not be fully deleted. The account can be restored at any time even after it was removed. You can access it any time by flipping the switch at Show removed accounts.
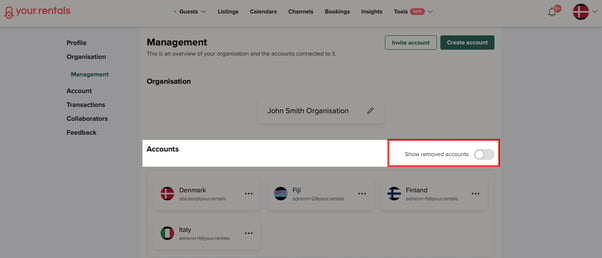
Remove or Delete?
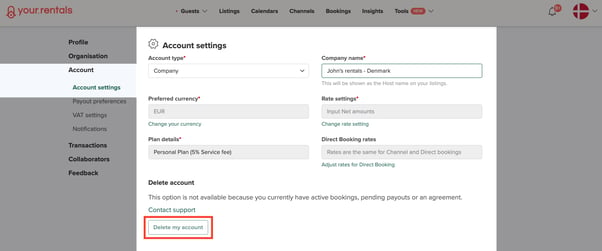
When you delete an Account on the other hand, it cannot be restored anymore, it will no longer exist.
If you are certain that you want to delete an Account:
- Go to “Settings”.
- Select the “Account” tab.
- Select “Delete my account” at the bottom of the page.
Updating Account email
Update your Account email in order to make sure you will get the notifications for each Account you have. When you signed up to Your.Rentals, the email you signed up with was assigned to the one Account you had. Multi-account management requires every Account to have its unique email address. It is important that you update the email address to each and every Account, so the app can notify you when there is any event in your Accounts.
If you would like to update the email address, follow the steps below:
- On the Management page, under Accounts, select “...” at the top right corner of the account you wish to update.

- Select “Edit account”.

- When the following window pops up, you are ready to make the changes.
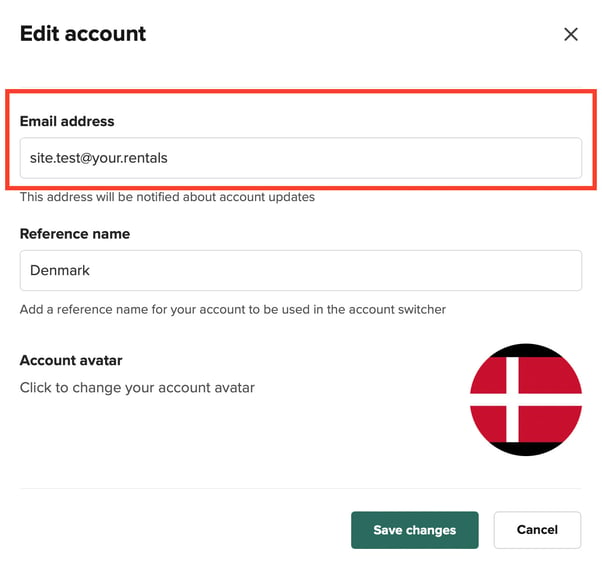
- Once you made the changes, select “Save changes” at the bottom of the window.
Updating Account avatar
To update your Account avatar, follow the same steps demonstrated in the previous section.
- At the top right corner of the account you wish to change, select “…” and “Edit account”.
- When the window pops up, at the bottom of the page you will find an Account avatar section. Click here to change your avatar.
![]()
- Once you have the correct avatar, select “Save changes”.
How to navigate between multiple Accounts? - The Account Switcher
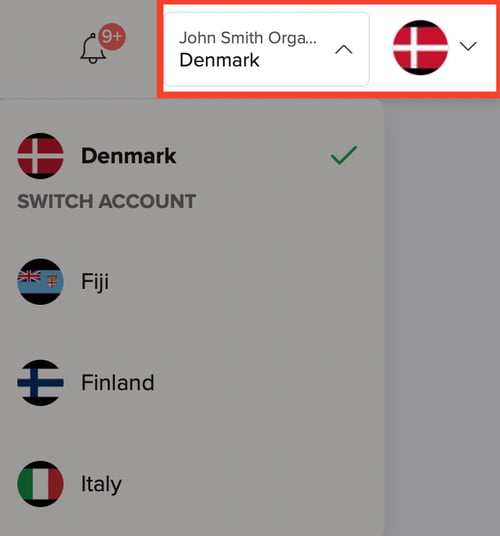
Once you have multiple Accounts added to your Organisation, you can easily switch between the Accounts through the Account Switcher. The Account Switcher is automatically visible when you have more than one Account added to your Organisation.
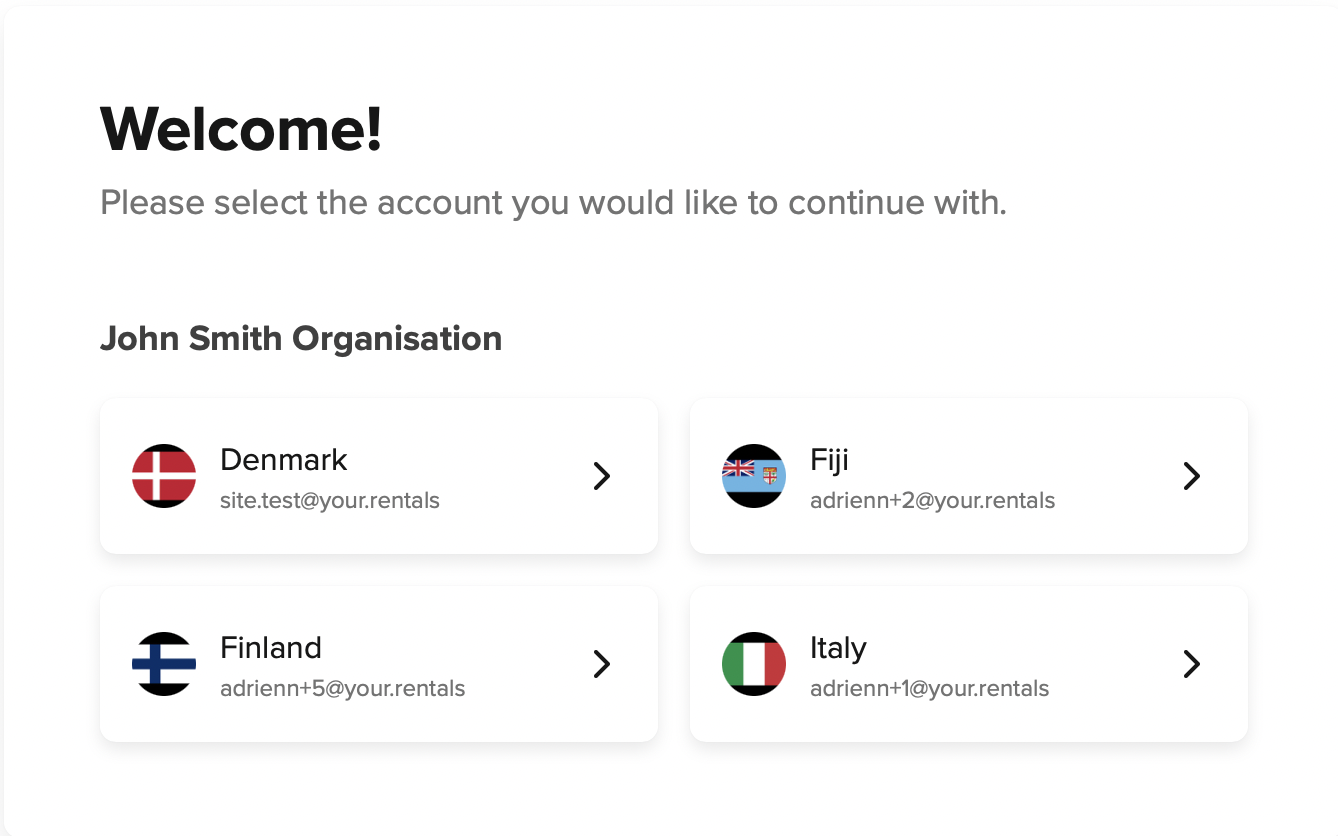
When you have multiple Accounts, the login page will look like the following:
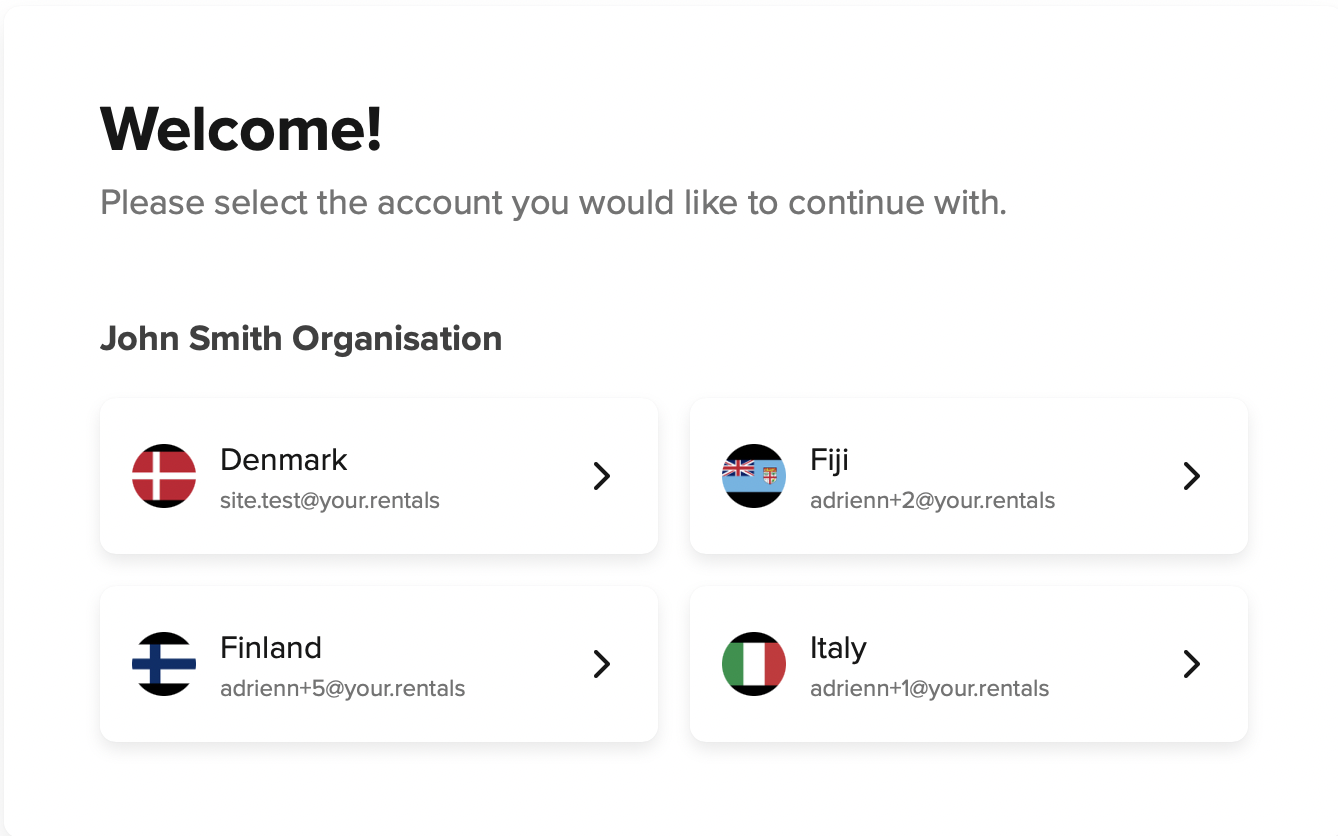
As you can see, the Account Switcher offers you to choose which Account you want to log in to. Once you logged in, you can also switch to another Account without having to log out and in again. You can find this feature in the top right corner of the website.
Group Listings according to your business needs under different Accounts
Multi-account management allows you to group Listings according to your business needs. What it means is that you can categorise your Listings into different Accounts based on different characteristics.
Example:
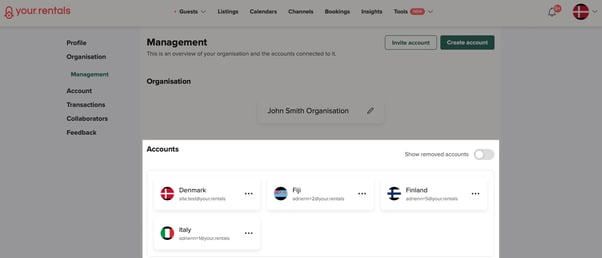
If you have multiple properties to manage in different countries and you would like to have these sorted out, Multi-account management assists you to do that. You can choose to use an Account for each country’s Listings.
The example below shows a user that uses the Accounts as described above. The user has different Accounts for properties in Fiji, Finland, Italy and so on.
If you have other preferences in grouping your Listings, you are free to arrange the groups based on your business needs. You can for instance arrange them by type or based on the owner, it is really up to you. Group your Listings to your convenience!
Setting different Payment methods per Account
Once you have multiple Accounts listed under your Organisation on the Management page, you can start to set different Payout methods for all the Listings set in each Account.
To set different Payout Methods:
- Go to “Settings”.
- Under “Account” select “Payout Preferences”.
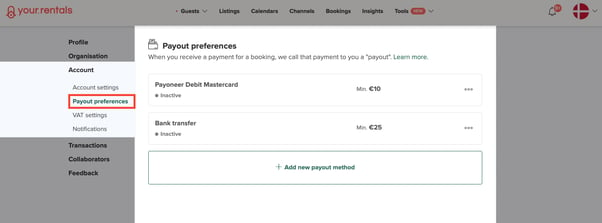
You can set different Payout methods to each Account but keep in mind that you can only set or change your Payout preferences for the Account that you are logged into at the moment. If you would like to set different Payout methods to another Account, use the Account Switcher in the top right corner of the page and log into the Account where you wish to make changes.
If unsure how to set your Payout preferences, please check our help article on Payout methods.

